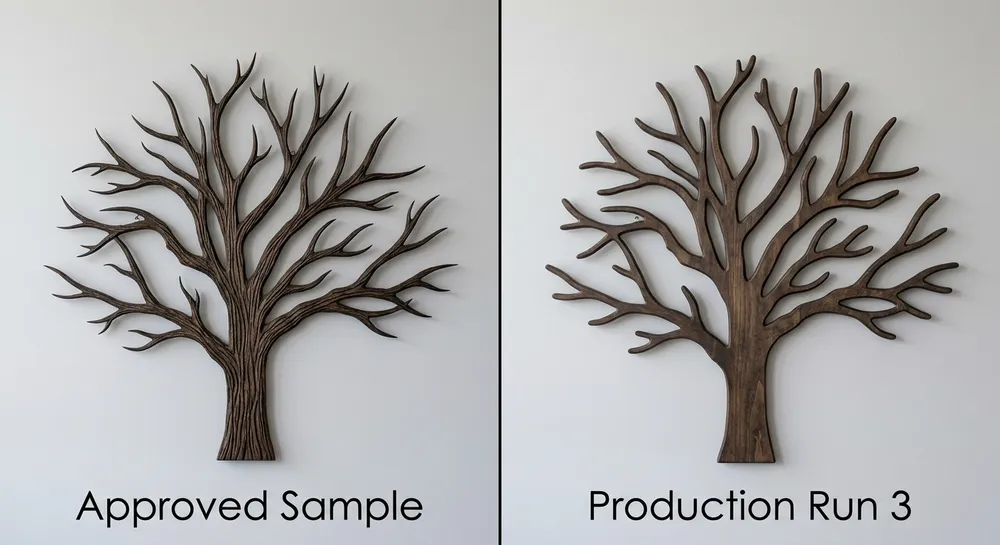
The first container looks right. Branch tips are sharp, the bark texture reads clearly, the silhouette holds its shape. Then the second order arrives — same spec sheet, same supplier — and the branch tips are rounded, the texture is shallow, and two SKUs have visible paint bleed along the leaf edges. Your retail buyer flags it. You're now eating the rework cost or the return.
This is the most common failure pattern we see when buyers scale up tree wall art orders. The sample was approved. The production run wasn't controlled to the same standard. The gap between those two outcomes is almost always traceable to three things: the wrong material for the motif complexity, no locked golden sample, and QC checkpoints that weren't specific enough to catch detail degradation before the container loaded.
This guide walks through how to prevent that.

Why tree motif detail breaks down at scale
Tree art is harder to hold consistent than most buyers expect. The motif has inherent complexity — branching geometry, varying line weights from trunk to twig, surface texture that needs to read at distance. Each of those elements degrades through a different mechanism.
On MDF and resin pieces, the detail lives in the mold or CNC toolpath. As the mold accumulates shots, the sharpest features — branch tips, fine leaf veins, bark ridge edges — wear first. A mold that produces clean detail at 500 units may be producing noticeably softer detail by unit 2,000 if the supplier isn't tracking mold life and scheduling maintenance. We run our own molds here and we pull them for inspection at defined intervals; a supplier who can't tell you their mold-life policy for a specific SKU is a risk.
On metal pieces — laser-cut or water-jet silhouettes — the detail consistency issue shifts to edge quality and finishing. Laser-cut steel holds branch geometry well, but burr removal and powder coat thickness both affect how the final edge reads. A 60–80μm powder coat on a 2mm branch tip looks clean. Push that to 120μm because the line operator didn't adjust settings between batches, and the tip looks blunt.
Hand-painted or hand-finished tree art has the most variables. Paint bleed along leaf edges, inconsistent wash depth on bark texture, color temperature drift between batches — these are real production risks on any order over a few hundred units unless the supplier has tight process controls and a locked color standard.
(We've seen buyers approve a hand-painted tree art sample, place a 1,000-unit order, and receive product where the "warm brown" bark finish had shifted noticeably cooler because the supplier switched paint suppliers mid-run. That's a sourcing control failure, not a manufacturing accident.)
Material options for tree motifs: what each handles well and where each breaks down
The material you specify determines which QC checkpoints matter most and how much detail you can realistically hold across a large run. Here's how the main options compare from a manufacturing standpoint:
| Material | Detail capability | Consistency risk at scale | Typical MOQ sensitivity |
|---|---|---|---|
| MDF (routed/molded) | Medium — good for bold silhouettes and moderate relief | Mold wear, paint adhesion at edges | Low — cost-effective at 100+ units |
| Solid wood | High for natural texture, lower for precision geometry | Grain variation, finishing inconsistency | Higher — more labor per unit |
| Metal (laser-cut steel/iron) | High for silhouette precision, lower for 3D texture | Edge burr, powder coat thickness drift | Medium — tooling setup cost amortizes at 200+ units |
| Resin | Highest for fine 3D detail reproduction | Mold wear on fine features, color batch variation | Medium — mold investment upfront |
We produce all four in-house, which matters more than it sounds. When a buyer wants a tree art piece with a laser-cut metal silhouette mounted on an MDF backing with a hand-applied patina finish, that's three processes that need to stay coordinated. If those happen at three different suppliers, the finish on the metal and the finish on the MDF will drift independently. Under one roof, we can match them to the same color standard on the same day.
For buyers sourcing wall arts by style and subject across multiple motifs, the material decision also affects your SKU mix economics. Metal silhouette tree art carries better perceived value at retail and holds detail longer in the supply chain — it doesn't dent or chip the way MDF can in transit. Resin is the right call when you need fine 3D branch and leaf detail that would be cost-prohibitive to achieve in solid wood at volume.

Silhouette vs 3D relief vs hand-painted: sourcing implications by technique
These three techniques have different cost structures, different QC failure modes, and different scalability profiles. Choosing the wrong one for your order size and retail price point is a sourcing mistake that shows up later as margin erosion or quality complaints.
Silhouette tree art (laser-cut metal or routed MDF) is the most scalable. The geometry is locked in the toolpath or cutting file — there's no hand interpretation involved. QC is straightforward: check edge quality, check finish consistency, check that the silhouette matches the approved file. At 500+ units, this is the lowest-risk technique for holding detail consistency. The trade-off is that it's a flat product — there's no depth or texture variation, which limits the retail price ceiling.
3D relief tree art (resin or carved MDF) gives you depth and texture, which supports higher retail price points. The sourcing risk is mold life and paint application. Fine branch tips and leaf edges are the first features to soften as the mold wears. We track shot counts per mold and schedule cavity maintenance before the detail degradation becomes visible — but not every supplier does this. When you're evaluating a 3D relief tree art supplier, ask specifically: what is your mold maintenance interval for this SKU, and can you show me units from early and late in a production run side by side?
Hand-painted tree art has the highest margin potential and the highest QC burden. Color consistency, paint bleed tolerance, and texture depth uniformity all need to be specified in writing — not just shown in a sample. We use a color chip system tied to specific paint codes, and our QC team checks wash depth against a physical reference panel, not just visual memory. On orders over 300 units, we recommend buyers provide a signed golden sample that stays on the production floor as the reference standard throughout the run.
(The "golden sample" step gets skipped more often than it should. Buyers approve a photo, the factory produces to their own interpretation, and by unit 400 the finish has drifted. A physical locked sample eliminates that ambiguity.)
Step-by-step sourcing process: from design file to approved production sample
This is the sequence we walk buyers through. Skipping steps here is where most quality problems originate.
Step 1 — Submit a complete design brief, not just a reference image. A Pinterest photo tells us the aesthetic direction. It doesn't tell us the substrate, the finish technique, the size, the hanging system, or the detail tolerance you need. A complete brief includes: finished dimensions, material preference, technique (silhouette / 3D / painted), target retail price point, and any specific detail requirements (branch-tip sharpness, texture depth, color range).
Step 2 — Request a material and technique recommendation before sampling. If you're not sure which material fits your order size and price point, ask. We'll tell you honestly — resin gives you better fine detail but the mold investment adds to your unit cost below 300 pieces. MDF is more cost-effective for bold silhouette work. This conversation before sampling saves you a wasted sample round.
Step 3 — Approve a physical sample, not a photo. Photos flatten texture and shift color. A physical sample lets you check branch-tip sharpness by touch, verify texture depth, and confirm the finish color under your actual retail lighting conditions. We ship samples within standard lead times; most buyers in this category start with 2–3 sample units across their preferred SKUs before committing to a bulk run.
Step 4 — Lock the golden sample. Once the sample is approved, sign it, photograph it with a ruler for scale reference, and confirm with your supplier that this exact unit stays on the production floor as the reference standard. This is non-negotiable for hand-painted and 3D relief techniques.
Step 5 — Specify your QC checkpoints in writing before production starts. Don't leave QC to the supplier's discretion. The next section covers exactly what to specify.
Step 6 — Request a pre-shipment inspection report. Before the container loads, you want a written report with photos confirming that the production units match the golden sample on the specific checkpoints you defined. We provide this as standard; if a supplier can't produce it, that's a red flag.

QC checkpoints specific to tree wall art
Generic QC — "check for defects, check dimensions" — doesn't catch the detail degradation that matters for tree motifs. These are the checkpoints that need to be written into your purchase order or quality agreement:
Branch-tip sharpness Define the minimum acceptable tip radius. For laser-cut metal, sharp tips should have no visible burr and no rounding from over-sanding. For resin and MDF, compare against the golden sample — if the tip profile has softened by more than what's visible at arm's length, reject the batch and check the mold.
Texture depth uniformity For bark texture and leaf surface texture, the depth should be consistent across the piece and across units in the batch. A simple check: run your fingernail across the texture on 5 random units from the batch and compare the tactile depth to the golden sample. Shallow texture on some units and deep texture on others means the mold is wearing unevenly or the resin pour isn't consistent.
Paint bleed tolerance For hand-painted pieces, define the maximum acceptable bleed distance at leaf and branch edges — typically 0.5–1.0mm for fine detail work. Check under good lighting at a 45-degree angle. Bleed that's invisible straight-on becomes visible when the piece is lit from the side on a retail shelf.
Color consistency across the batch Pull 10 units at random and compare them side by side under consistent lighting. For hand-painted finishes, the acceptable color range should be defined against the golden sample, not against each other. Batch-to-batch color drift is the most common complaint we hear from buyers who didn't specify a color standard upfront.
Finish adhesion at edges and joints For MDF pieces, check paint and finish adhesion at routed edges — this is where adhesion fails first, especially in humid shipping conditions. For metal pieces, check powder coat adhesion at cut edges and any welded joints. A fingernail scratch test at the edge gives you a quick read on adhesion quality.
Dimensional accuracy Check finished dimensions against spec on 5 units per SKU. For wall art, the critical dimension is usually the overall width and height — a 5mm variance on a 600mm piece is acceptable; a 15mm variance means the cutting or molding process isn't controlled.
| Checkpoint | Method | Acceptable tolerance |
|---|---|---|
| Branch-tip sharpness | Visual + touch vs golden sample | No visible softening at arm's length |
| Texture depth | Fingernail drag across 5 random units | Consistent with golden sample ±10% |
| Paint bleed | 45° lighting inspection | ≤1.0mm at leaf/branch edges |
| Color consistency | 10-unit side-by-side comparison | Within golden sample color range |
| Finish adhesion | Fingernail scratch at edges | No flaking or lifting |
| Dimensions | Tape measure, 5 units per SKU | ±5mm on overall dimensions |
Common sourcing mistakes that cause detail quality failures
These are the patterns we see repeatedly when buyers come to us after a bad run with another supplier.
Underspecifying detail tolerances in the PO. "High quality finish" means nothing. "Branch tips sharp to golden sample standard, paint bleed ≤1.0mm at leaf edges" means something. The more specific your written spec, the less room for interpretation — and the easier it is to reject non-conforming product with documentation.
Skipping the golden sample lockdown. Approving a photo or a digital render and moving straight to production. The sample exists to lock the standard. If it's not physically on the production floor, the standard drifts.
Ignoring mold-life limits on 3D relief pieces. A supplier who quotes you a low unit price on resin tree art may be planning to run the mold well past its useful life. Ask for the mold shot count at the time of your order and the maintenance schedule. If they can't answer, the detail quality on your order is unpredictable.
Ordering across multiple production runs without re-locking the standard. If you place a 500-unit order, then reorder 500 units six months later, the second run needs to be checked against the original golden sample — not just against itself. Color, texture, and finish can drift between runs even with the same supplier.
Choosing technique based on sample price, not production scalability. Hand-painted tree art samples look great and cost relatively little to produce. At 1,000 units, the labor cost and QC burden are significant. If your order volume is above 500 units, silhouette or 3D relief techniques usually give you better cost-consistency and lower QC risk.
How to structure your RFQ for tree wall art
A well-structured RFQ gets you a useful quote. A vague one gets you a number that will change after sampling.
Include these elements:
- Finished dimensions (W × H × D, in mm or inches)
- Material preference (MDF / metal / resin / solid wood, or "open to recommendation")
- Technique (silhouette / 3D relief / hand-painted, or "open to recommendation")
- Finish description (color, texture type, any special effects — patina, distressed, metallic)
- Target quantity (initial order + expected annual volume — this affects whether mold investment makes sense)
- Target retail price point (helps us recommend the right material and technique combination)
- Detail requirements (any specific branch, leaf, or texture elements that are non-negotiable)
- Packaging requirements (retail-ready, inner box, master carton specs)
- Destination market (affects compliance requirements — CE for Europe, relevant for coating materials)
The more of this you provide upfront, the more accurate the quote and the faster the sampling process. We can work from a reference image plus these parameters and come back with a material recommendation and indicative pricing before you commit to a sample order.
Our MOQ starts at 100 pieces for standard models — useful if you want to test a new tree art SKU with your retail buyers before committing to a larger run. For custom profiles developed through our OEM/ODM process, our 12-engineer team can take your design file from concept to production sample, with full CAD drawings and material specifications included in the technical proposal.
For more on the range of tree art styles and formats we produce, see our tree wall art design variations reference.
FAQ
What's the minimum order quantity for custom tree wall art with a specific branch profile?
100 pieces for standard models. For fully custom profiles — where we're developing new tooling or a new mold from your design file — the MOQ depends on the tooling investment, but we can discuss amortizing that cost into the unit price across your first order. Send us your design file and target quantity and we'll give you a straight answer on what makes sense.
How do I prevent color drift between my first order and a reorder six months later?
Lock a physical golden sample at first-order approval and keep it. When you reorder, send us a reference photo of the original golden sample alongside your PO, and specify that the reorder must match it. We maintain production color records for active SKUs, but a physical reference on your end is the safest backstop. For hand-painted finishes, we also recommend specifying the paint code by name in your purchase order — not just "warm brown."
Which tree art technique holds up best in humid climates (Southeast Asia, Middle East coastal markets)?
Laser-cut metal with powder coat is the most durable option for humid environments — our standard powder coat passes a 500-hour salt spray test, which covers most coastal retail conditions. MDF is the most vulnerable: if the edge sealing isn't done properly, humidity causes swelling and finish delamination. If your distribution market includes humid climates, specify edge-sealed MDF or switch to metal or resin for those SKUs.
How does tree motif complexity affect per-unit cost at scale?
More complexity means more mold cost upfront and more QC time per unit. A simple two-branch silhouette in laser-cut metal is straightforward to price and scale. A full-canopy 3D resin tree with fine leaf detail requires a more expensive mold, shorter mold maintenance intervals, and more inspection time per unit. The cost difference between a simple and complex tree motif can be 30–60% at the unit level, depending on technique and order size. We'll give you a breakdown when you send your design brief.
—
If you're ready to move from reference images to a technical proposal, send us your design files and target quantities — we'll come back with material recommendations, technique options, and pricing within 48 hours.