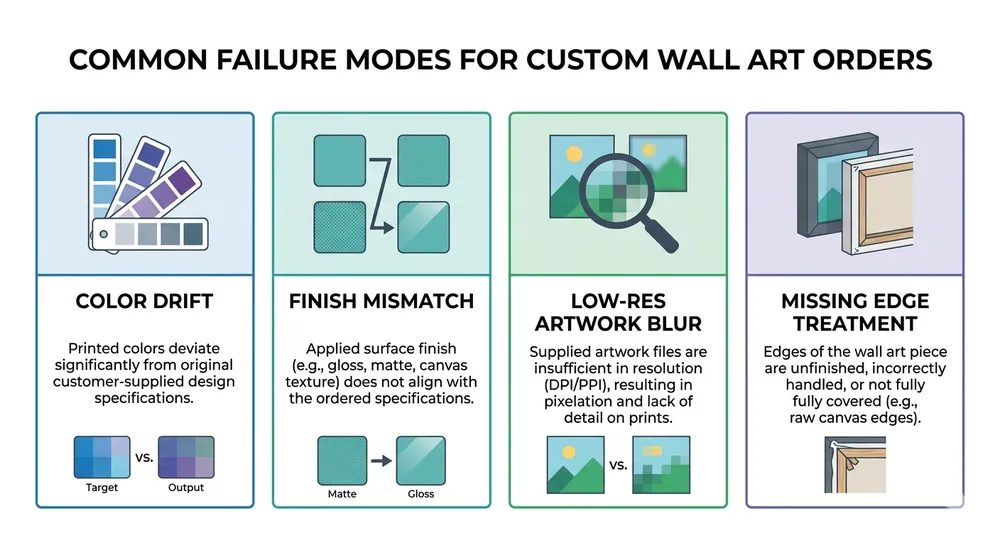
The order arrives. You open the carton. The finish is wrong — matte where you specified satin, or the color has drifted two shades warm from the approved sample. The artwork detail that looked crisp in your mockup has blurred into a muddy texture at production scale. You're now looking at a container of product that won't pass your buyer's inspection, a reorder conversation you don't want to have, and a lead time you can't recover.
This happens more often than it should, and almost always for the same reason: the design brief that left your desk wasn't factory-ready. Not because you didn't try — but because creative wall art orders carry more specification variables than standard mirror or frame orders, and most buyers don't know which ones the factory actually needs to lock before cutting material.
I've spent 12 years at Livewellcraft working through exactly this problem — managing color and finish accuracy across hundreds of style-specific wall art SKUs for US retail programs. What follows is the process we use internally, and the one we walk new OEM buyers through before their first production run.

What a factory-ready design brief actually contains
Most buyers send a mood board, a reference photo, and a target size. That's a starting point, not a brief. Here's what the factory actually needs to quote accurately and produce without revision cycles:
Dimensions and substrate
- Finished size (W × H × D), including frame profile if applicable
- Substrate: MDF, solid wood, metal sheet, resin panel, canvas over stretcher, or mixed
- Edge treatment: square cut, beveled, wrapped, or framed — and if framed, the profile depth
Artwork file requirements
- Minimum 300 DPI at final print size for any printed or UV-transferred element
- Vector format (AI or EPS) for any line art, text, or geometric pattern
- Color mode: CMYK for print, with Pantone references for any color that must match across substrates
- File format: PDF/X-1a or layered PSD — not JPG exports from a presentation deck
Finish specification
- Sheen level: matte, satin, semi-gloss, or gloss — stated explicitly, not implied by a reference photo
- Finish type: UV coating, hand-painted, powder coat, lacquer, or raw/natural
- Texture callout if applicable: smooth, linen, brushed, distressed, or embossed
Color references
- Pantone Matching System (PMS) codes for any color that must be consistent across a bulk run
- RAL codes for powder-coated metal elements
- Physical color chip or approved sample for hand-painted or stained wood finishes — photos don't transfer accurately enough
Hardware and hanging system
- D-ring, keyhole, French cleat, or wire — and the weight rating required
- Sawtooth hangers are fine for lightweight pieces under 2 kg; anything heavier needs a proper D-ring or cleat spec
- If the piece ships to retail, confirm whether the hanger must be concealed or can be visible
(We've had buyers skip the hardware callout entirely, then discover their 4 kg resin panel shipped with a sawtooth hanger that their retail buyer immediately flagged. A one-line spec prevents that.)

Where the miscommunication actually starts
Finish sheen is the single most common source of disputes we see. A buyer sends a reference image — usually a lifestyle photo from Pinterest or a competitor's product listing — and writes "same finish as this." The problem is that photography doesn't capture sheen accurately. A satin finish photographs identically to a semi-gloss under certain lighting. The factory interprets the reference, produces to their interpretation, and the buyer receives something that looks wrong even though the factory followed the brief as written.
The fix is simple: state the sheen level in words, not by reference image. If you're not sure of the exact term, request a finish sample card from the factory before confirming the order. We send these on request — it takes a week and costs nothing, and it eliminates the most common rejection reason we see on first-time orders.
Color drift across a bulk run is the second failure mode. This is a production reality, not a quality failure — pigment batches vary slightly, and hand-applied finishes have natural variation. The question is how much variation your buyer will accept. For retail programs, the answer is usually tight: Delta-E ≤ 3 on printed elements, and within one approved physical sample for hand-painted finishes. If you don't specify a tolerance, the factory will apply their own standard, which may not match your buyer's expectation.
Low-resolution artwork is the third. We see this constantly on first orders from buyers who are used to working with print-on-demand platforms. A 72 DPI image that looks sharp on a screen will print at roughly 24% of the quality needed for a clean wall art reproduction at 60 × 80 cm. The factory can flag this during design review — but only if you submit the actual production file, not a mockup render.
Material substitution is less common but more expensive when it happens. If your brief says "wood frame" without specifying solid wood versus MDF, the factory will use MDF — it's cheaper, more stable, and easier to machine. That's not wrong, but if your buyer's product description says "solid wood frame" and the piece ships with MDF, you have a compliance problem. Specify the substrate explicitly.
The ordering workflow, step by step
A clean creative wall art custom order moves through six stages. Skipping or compressing any of them is where cost accumulates.
Stage 1 — Technical inquiry Submit your design brief with all the fields above, plus your target quantity and required delivery window. At this stage, the factory is checking feasibility: can the technique be executed at your MOQ, are the materials available, and does the artwork file meet production requirements? Expect a response within 48 hours if the brief is complete; expect back-and-forth if it isn't.
Stage 2 — Design review and engineering feedback This is the stage most buyers undervalue. A factory with an in-house engineering team — like our 12-person OEM/ODM group here — will review your brief against production constraints and flag issues before sampling begins. Common flags: artwork resolution too low for the specified print method, finish combination incompatible with the substrate, or hardware spec undersized for the piece weight. Resolving these at Stage 2 costs nothing. Resolving them at Stage 4 costs a sample remake and two weeks.
Stage 3 — Quotation and order confirmation Once the brief is technically cleared, you receive a detailed quote covering unit cost, tooling or setup fees (if any), sample cost, and lead time. Confirm the order with a written PO that references the approved brief version — not just a verbal agreement. Version control on the brief matters: if the factory produces to an earlier draft, you have no recourse.
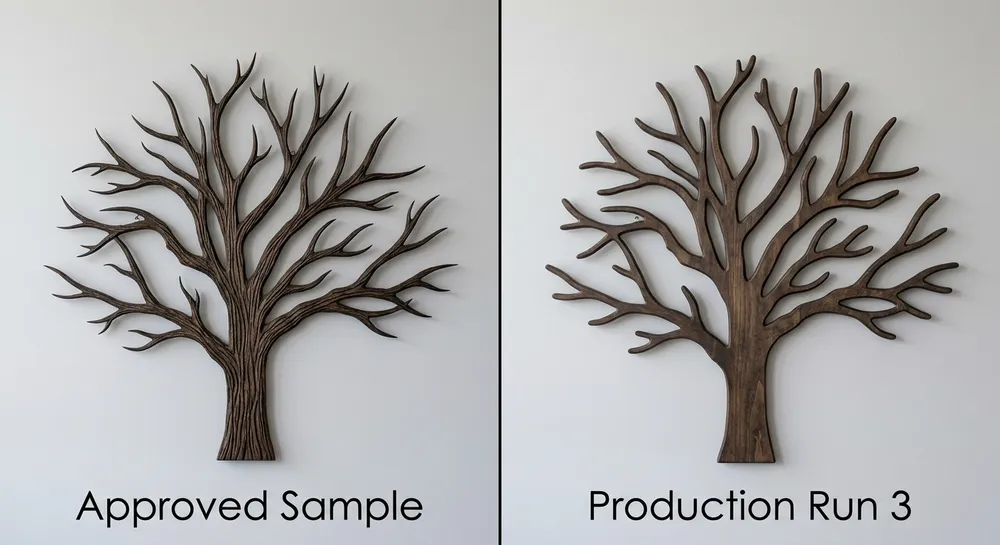
Stage 4 — Pre-production sample This is the most important checkpoint in the entire process. The pre-production sample is made with actual production materials — not a mock-up, not a 3D render. At Livewellcraft, samples come off the same lines that will run your bulk order, using the same substrate, finish, and hardware. Review the sample against your brief point by point:
- Dimensions within ±2 mm of spec
- Finish sheen matches the approved reference
- Color within agreed Delta-E tolerance
- Artwork detail sharp at the specified resolution
- Hardware correctly specified and securely mounted
- Edge treatment clean and consistent
Sign off in writing. Any change after sample approval — even a minor finish adjustment — restarts the sample stage.
Stage 5 — Bulk production and mid-run QC For orders over 500 pieces, request a mid-run photo report at the 20–25% production mark. This catches color drift or finish inconsistency early, when correction is still possible without scrapping the run. For orders under 500 pieces, a pre-shipment inspection report is usually sufficient.
Stage 6 — Pre-shipment inspection 100% visual inspection on finished pieces before packing. Check for surface defects, finish consistency, hardware security, and packaging integrity. At Livewellcraft, this is standard — every unit is inspected before it loads. If you're using a third-party inspector (SGS, Bureau Veritas), confirm the inspection criteria in writing before production starts, not the day before shipment.

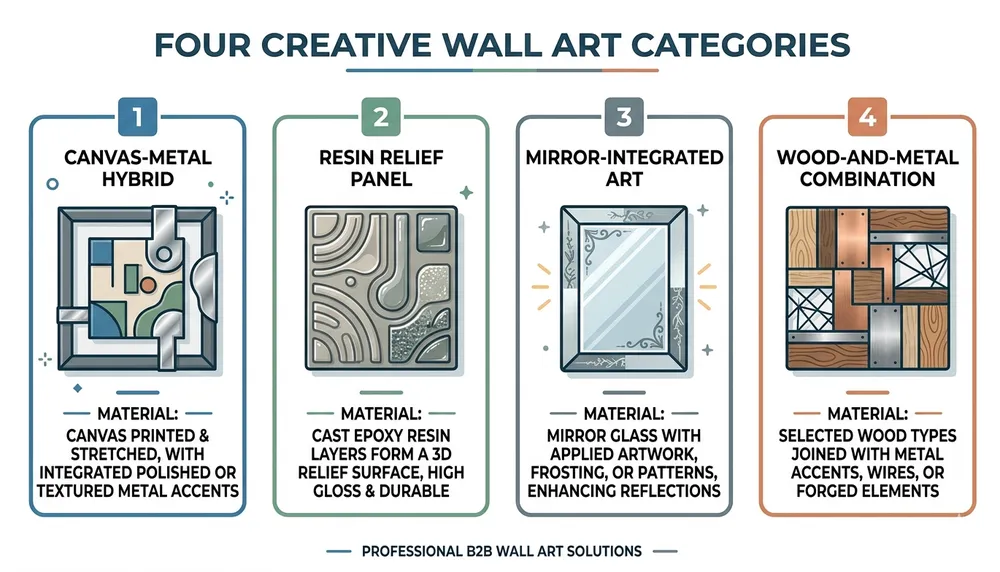
Material and technique constraints worth knowing before you brief
Creative wall art spans a wider material range than standard mirrors or frames, and not every combination that looks good in a concept render is feasible at production scale. Here's what actually matters:
Mixed media combinations Resin over wood is feasible and produces good results — we run this regularly. Resin over metal requires a primer step that adds cost and lead time. Metal inlay into MDF is feasible for simple geometric shapes; complex inlay patterns require CNC routing tolerances that push the unit cost up significantly. If your concept involves two or more substrate materials, ask the factory to confirm the joining method and whether it affects the finish sequence.
Hand-painted elements Hand-painted finishes have natural variation — that's part of their commercial appeal. But "hand-painted" means different things to different factories. Clarify whether you want a fully hand-painted surface, a hand-applied accent over a base coat, or a printed base with hand-painted highlights. Each has a different cost structure and a different consistency profile across a bulk run.
Print methods and resolution floors UV flatbed printing on rigid substrates (MDF, wood, metal) requires a minimum 150 DPI at final size for acceptable quality, and 300 DPI for fine detail or photographic reproduction. Screen printing on canvas or fabric requires vector artwork or high-contrast raster at 300+ DPI. Sublimation on metal panels requires specific aluminum alloy substrates — not all metal sheet is compatible.
Finish compatibility across substrates Lacquer over raw MDF requires a sealer coat first — skip it and the lacquer raises the grain and looks rough. Powder coat is only applicable to metal substrates. Oil-based stains on solid wood are incompatible with water-based topcoats unless fully cured first (typically 48–72 hours between coats). If your brief specifies a finish without specifying the substrate, the factory will make a choice — make sure it's the choice you intended.
(The finish-substrate compatibility issue is where we catch the most preventable problems during design review. A quick check at Stage 2 saves a sample remake at Stage 4.)
How to evaluate a pre-production sample against your brief
Receiving a sample and approving it are two different things. Here's the evaluation sequence we recommend:
- Measure first. Dimensions before aesthetics. A piece that's 3 mm short on one side will create a packaging problem at scale.
- Check finish sheen in natural light. Artificial lighting flattens sheen differences. Take the sample to a window.
- Compare color against your reference. Use your approved Pantone chip or physical color reference, not a screen. Screens vary.
- Inspect artwork detail at arm's length and at 30 cm. Both distances matter — arm's length is how it reads on a wall, 30 cm is how your buyer's customer will examine it in-store.
- Test the hardware. Mount the piece on a wall or test board. Confirm the hanger is level, secure, and rated for the weight.
- Check the edges and back. Retail buyers inspect backs. Rough edges, exposed MDF, or unfinished backs are rejection triggers.
If anything fails this check, document it with photos and written notes against the specific brief line item. "The finish looks a bit off" is not actionable feedback. "Finish sheen is semi-gloss; brief specifies satin — please adjust" is.
When to bring the manufacturer's engineering team in early
The earlier you involve the factory's engineering team, the cheaper the order gets. This sounds counterintuitive — more involvement feels like more cost — but the math runs the other way.
A design concept that hasn't been reviewed against production constraints will generate revision cycles. Each revision cycle on a sample costs time and, depending on the factory's sample policy, money. More importantly, it delays your delivery window, which has downstream cost in your own supply chain.
The cases where early engineering involvement pays off most clearly:
- New material combinations you haven't ordered before — the factory knows which combinations have failed in production and which are reliable
- Tight color matching requirements across multiple SKUs in the same order — the engineering team can flag which finishes are batch-sensitive before you commit
- Retail compliance requirements — if your buyer has specific packaging, labeling, or testing requirements (ASTM, CPSC, California Prop 65), the factory needs to know before production, not before shipment
- High-complexity artwork — fine line detail, gradient transitions, or photographic reproduction all have production-side constraints that aren't visible in a digital mockup
Our OEM/ODM team reviews incoming design briefs and provides written technical feedback before sampling begins. For buyers placing their first creative wall art order with us, this review typically catches two or three specification gaps that would have generated sample remakes. For buyers with established briefs, it's a quick confirmation that the new concept is within the production envelope.
The 100-piece MOQ on standard models exists specifically to make this process accessible for concept testing — you can validate a new creative direction at low volume before committing to a full retail program. Creative Wall Arts covers the full range of styles and substrates we currently produce.
FAQ
What file format should I send for a creative wall art custom order?
For print or UV transfer elements: PDF/X-1a or layered PSD at 300 DPI minimum at final print size. For line art, text, or geometric patterns: AI or EPS vector files. Avoid sending JPG exports from presentation software — they compress detail and embed sRGB color profiles that don't translate accurately to CMYK production. If you're unsure whether your file meets the spec, send it during the technical inquiry stage and we'll check it before quoting.
How do I specify color accurately for a bulk wall art order?
Pantone Matching System (PMS) codes for printed or painted colors, RAL codes for powder-coated metal. For hand-painted or stained wood finishes, a physical color chip or approved sample is the only reliable reference — photos and screen captures don't transfer accurately enough for production matching. State your acceptable Delta-E tolerance in the brief; for retail programs, Delta-E ≤ 3 is a reasonable starting point.
Can I order mixed-media creative wall art at low MOQ?
It depends on the combination. Standard substrate-plus-finish combinations (MDF with UV print, wood with hand-painted finish, metal with powder coat) are available from 100 pieces. Complex mixed-media combinations — resin over metal, multi-material inlay, or pieces requiring custom tooling — typically require higher MOQs because the setup cost needs to amortize across more units. Confirm the MOQ for your specific concept during the technical inquiry stage.
What's the difference between a pre-production sample and a mock-up?
A mock-up is a digital render or a hand-built prototype using substitute materials — useful for concept visualization, not for production approval. A pre-production sample is made on the actual production line using the actual materials, finish, and hardware specified in your brief. Only a pre-production sample tells you what your bulk order will look like. We don't recommend approving bulk production from a mock-up alone.
How do I prevent color drift across a large bulk run?
Three controls: (1) specify Pantone or RAL references in the brief rather than relying on reference photos, (2) approve a physical pre-production sample and retain it as the production standard, (3) request a mid-run photo report at the 20–25% production mark for orders over 500 pieces. Color drift is a production reality — the question is whether you've set up the controls to catch it early.
—
If your next creative wall art order involves a new concept, an unfamiliar material combination, or tight color requirements, the right move is to get the factory's engineering team involved before sampling. Send your concept, reference images, and target quantities to our OEM ODM Services team — we'll review the brief, flag any production constraints, and return a detailed quote. You can also browse our current Wall Arts by Style & Subject range to see what's already in production, or request a quote directly if you have a brief ready to submit.